Skills: RAS/NAT, DHCP, Windows 10, Installing Windows, Active Directory, Joining a domain, CMD, Troubleshooting
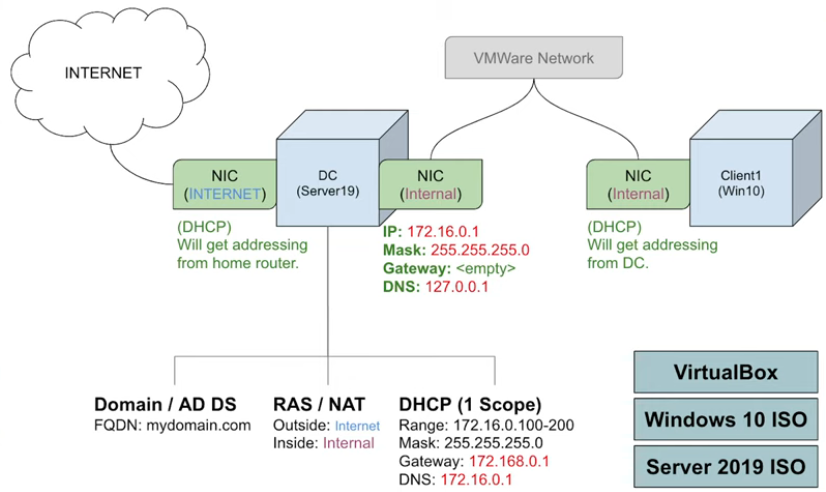
In this post, we will be continuing the setup of a Windows Server 2016 and Active Directory Lab. I used this video from Josh Madakor to help set this lab up. I finished my last post with installing Active Directory and setting up a domain administrator account. To finish the setup I will configure routing and network address translation and set up a DHCP server which will allow our client computer to access the internet by using an internal network connected to a server. After that, I will configure a DHCP server. All of the network is setup using the diagram below. After that is configured, I will install Windows 10 on a new client in VirtualBox and join that client to the domain. In addition, I will create a user account in Active Directory, that we will use to login to the client computer. I will also make an additional blog post that uses a Powershell script from Josh Madakor’s video that automatically adds a large amount of users to our domain.
Installing Remote Access and Configuring RAS/NAT
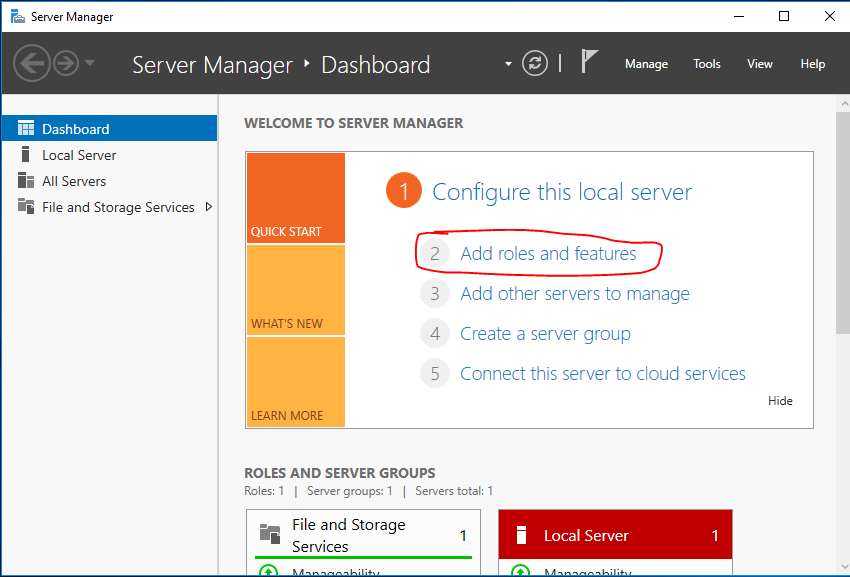
So to complete our network here, we need to install/configure a remote access server and configure network address translation (NAT). What’s happening here, is our client is connecting to our server (and using the servers internal NIC as a default gateway) through the internal network and in doing so gaining access through the internet through the server, which is connected to the internet via its NIC connected to the internet. So the server is acting is the default gateway for the client and using NAT to allow the client to reach the internet. Once the server is up, I go to Server Manager, and click “Add Roles & Features”.
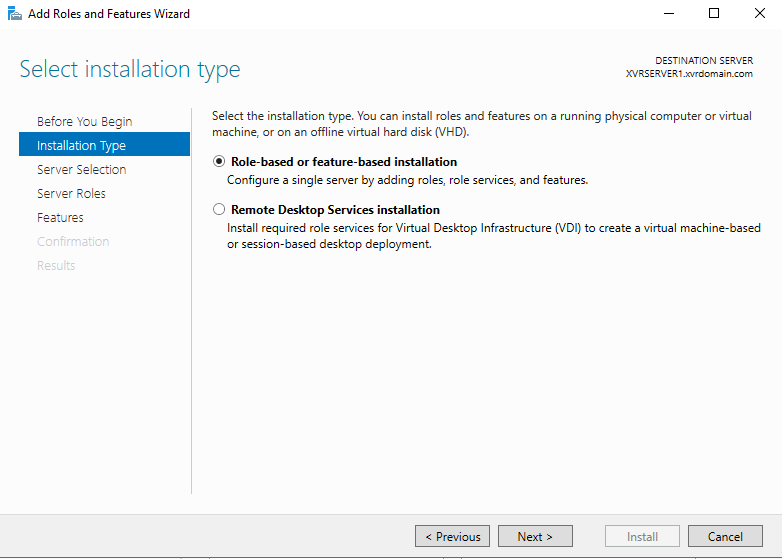
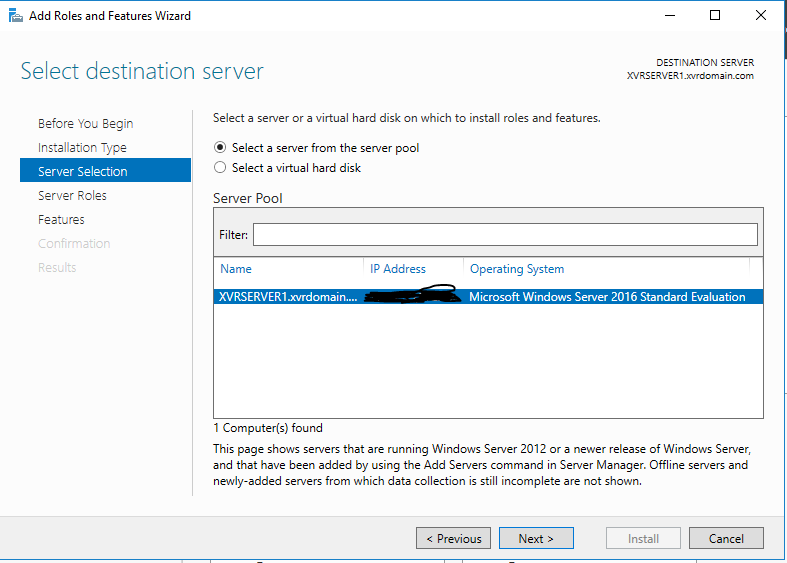
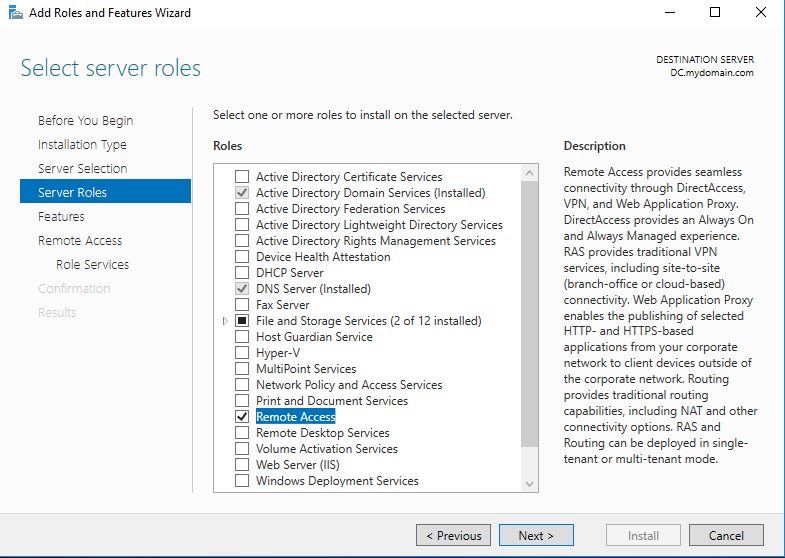
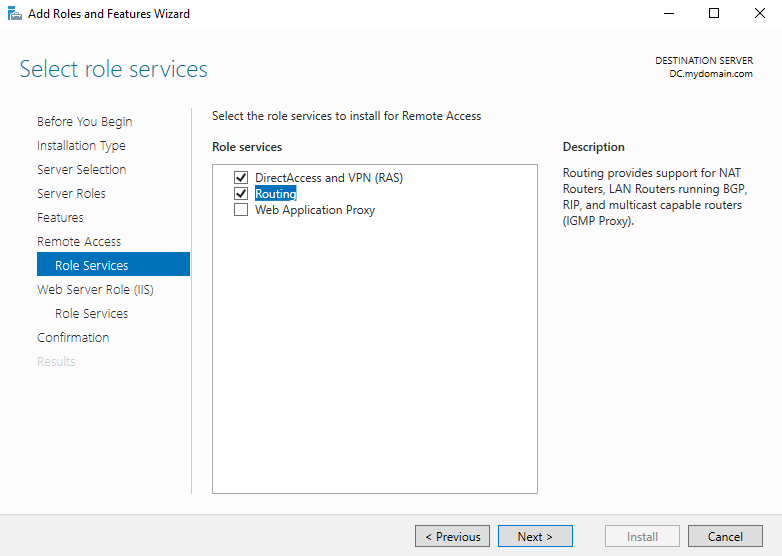
This brings up an installation dialogue(Add Roles and Features Wizard) that I will follow through to install. On the “Before You Begin” click next. For installation type, select “Role-based or feature-based installation”. Select your server in the next tab. In the “Server Roles” tab, check “Remote Access”. This will prompt another pop up window. I check “DirectAccess and VPN (RAS)” and “Routing”. We really only need routing at the moment, but I wanted to go ahead and install DirectAccess and VPN for later. After that, I just continued through the prompts until I could install.
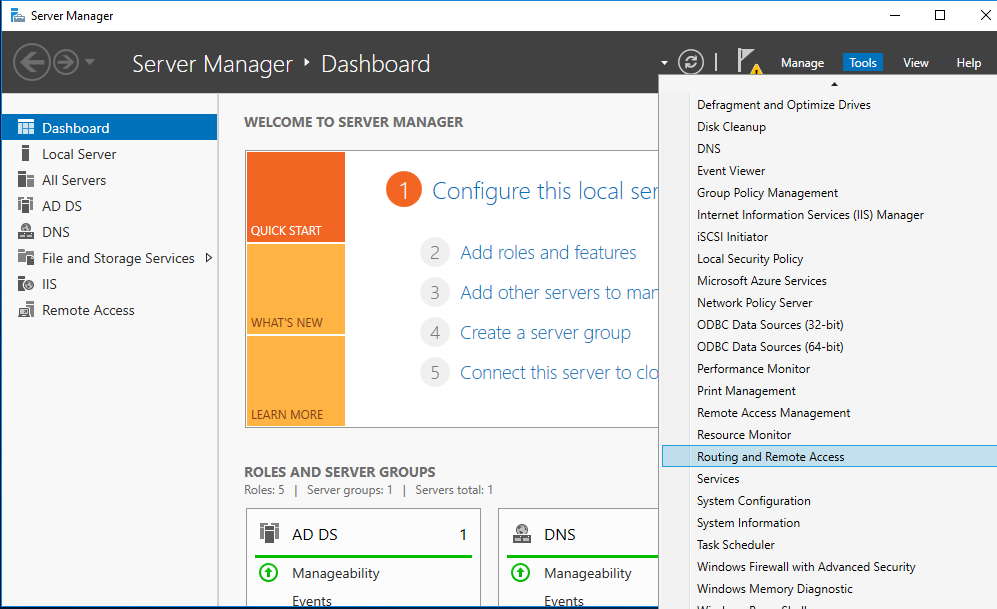
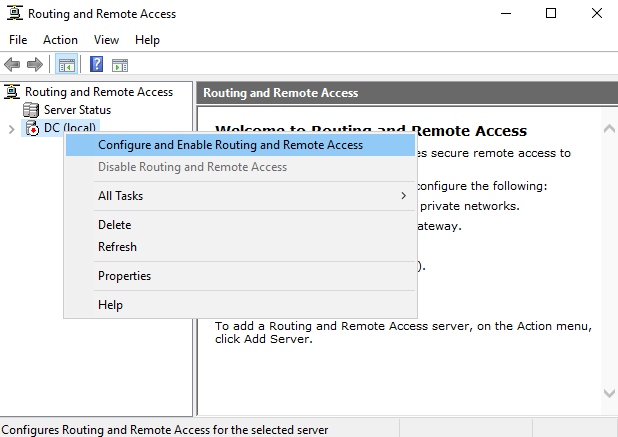
Once that finishes installing, head back to Server Manager. From Server Manager, click tools and in the drop down select “Routing and Remote Access”. From Routing and Remote Access, right click on the DC and select “Configure and Enable Routing and Remote Access”.
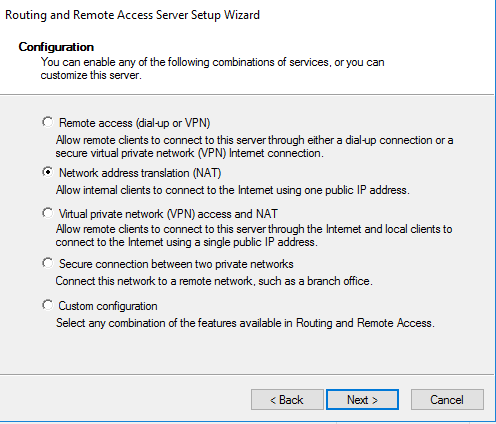
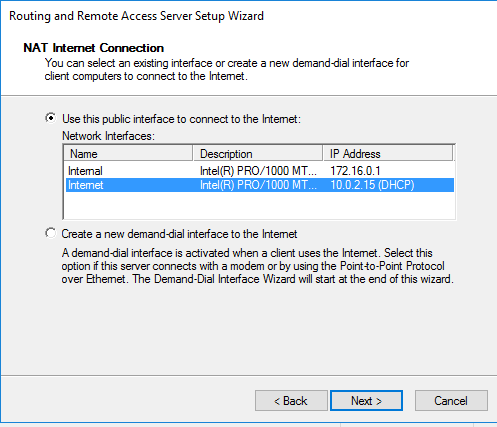
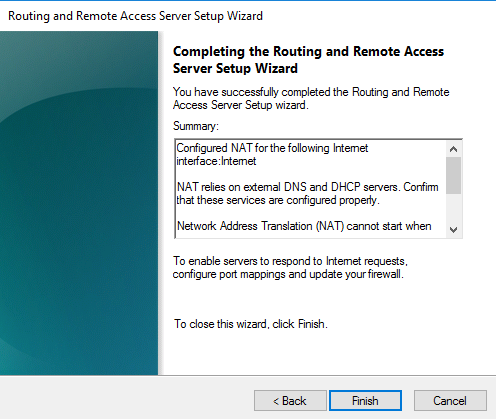
This will open up a configuration the configuration dialogue. On the first configuration window, select “Network address translation (NAT)” and click next. In my previous post, we renamed our NICs as “Internal” and “Internet”. This dialogue is asking us which interface to use to connect to the internet, so logically, we want to select the NIC named “Internet”. After that we want to continue until we can click finish to close the installation wizard. Now that the NAT is installed and configured, it time to install a DHCP server in Active Directory.
Installing and Configuring DHCP
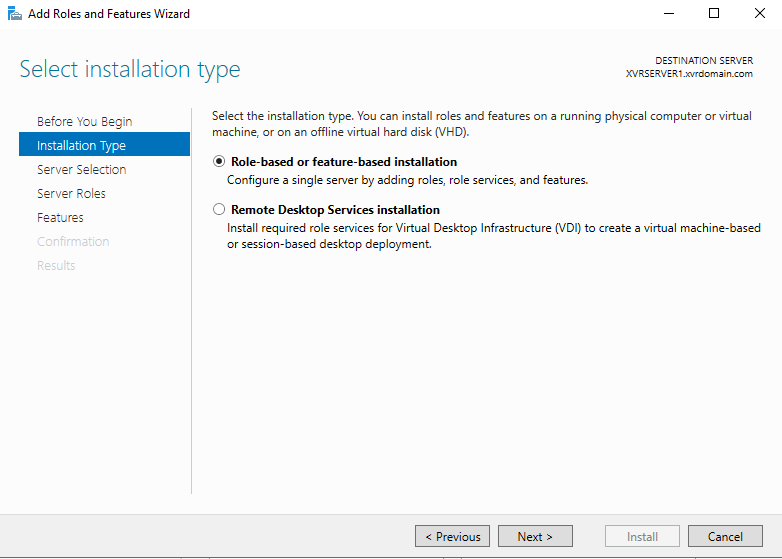
To install the DHCP server, head back to Server Manager and click on “Add roles and feature” again. Select “Role-based or feature-based installation”, click next, and select your server. Continue to the “Server Roles” dialogue, and select DHCP server. This can be done all at once, but for learning purposes, I am going through and doing each part one at a time. A features pop up will come up. Click “Add Features” and continue through the wizard until the DHCP server is installed.
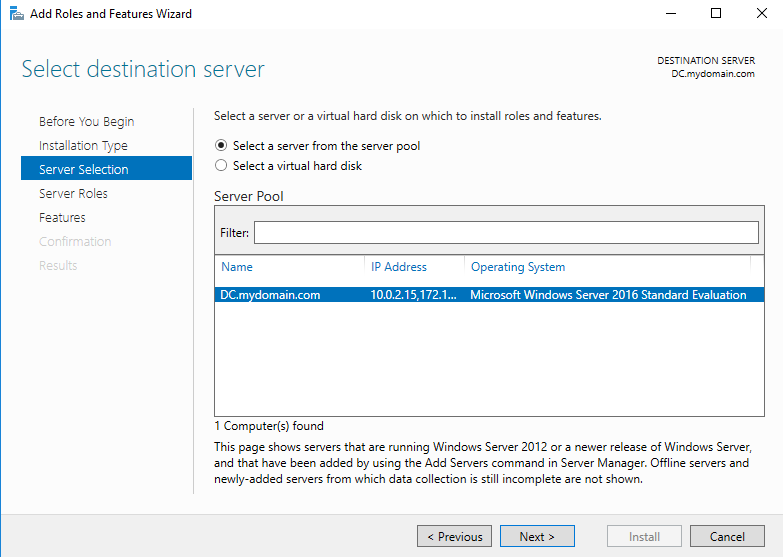
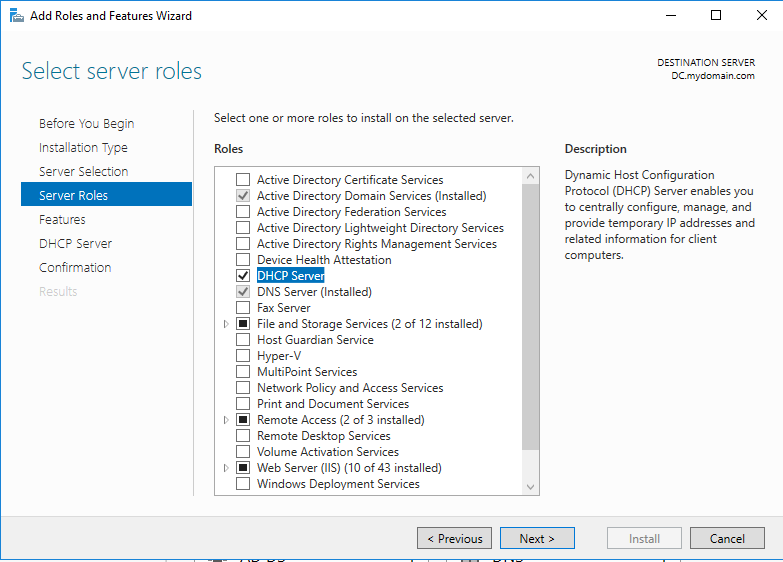
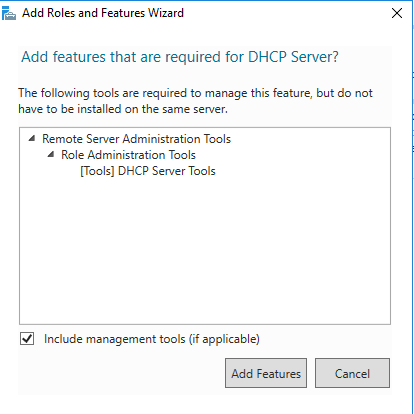
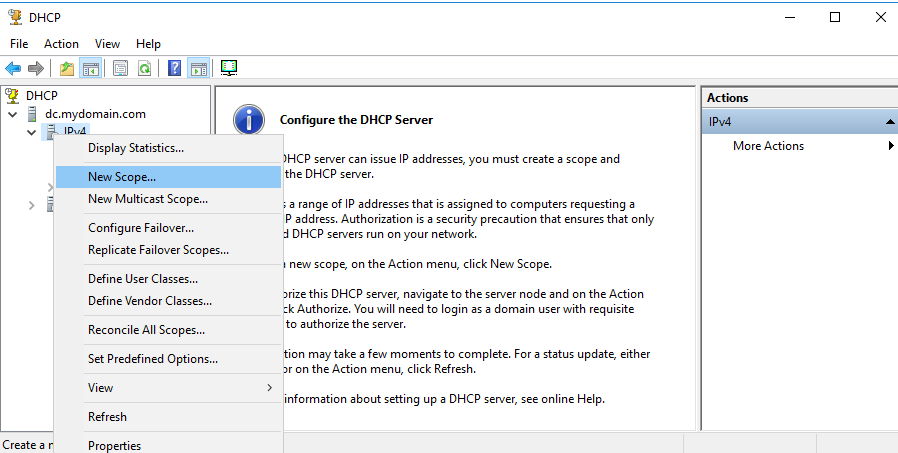
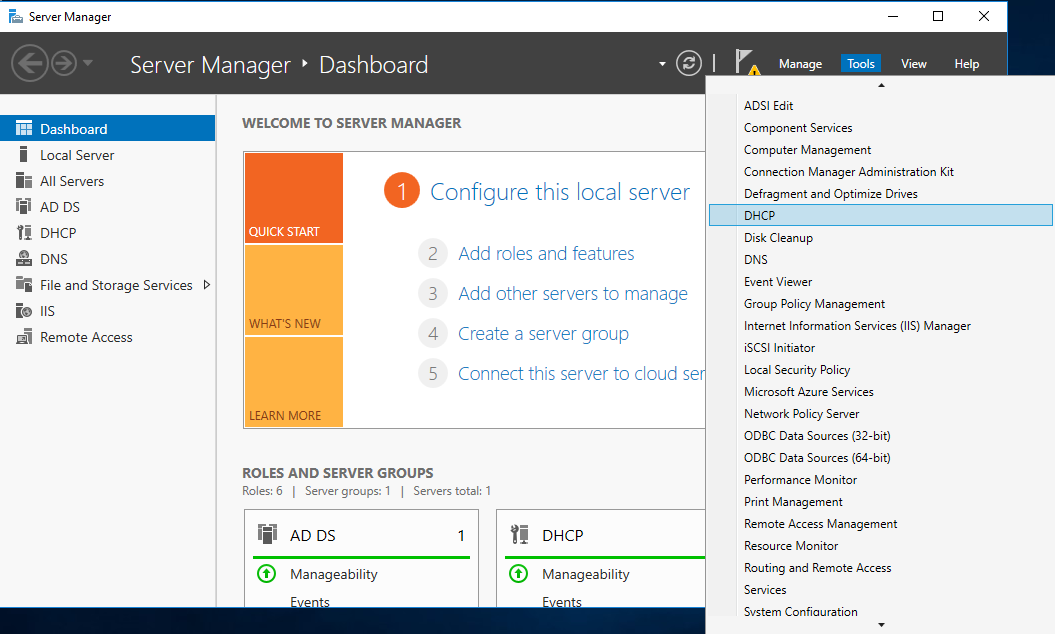
Now that the DHCP server is installed, it needs to be configured. Go back to Server Manager. In the top right, click tools, and in the drop-down menu, select DHCP. When the DHCP tool opens up, click the arrow next to your domain to expand the view. Once expanded, right-click on IPv4 and select new scope.
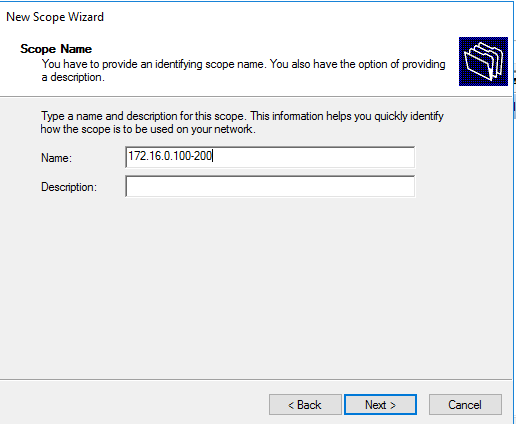
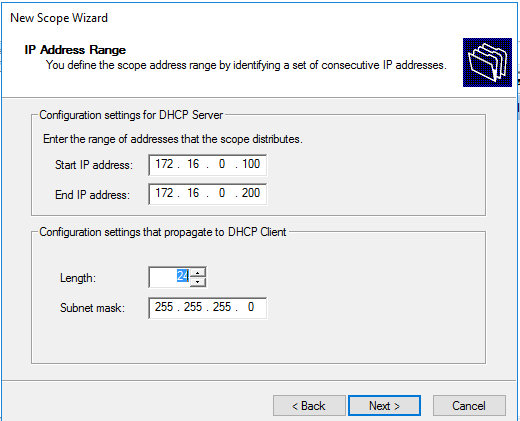
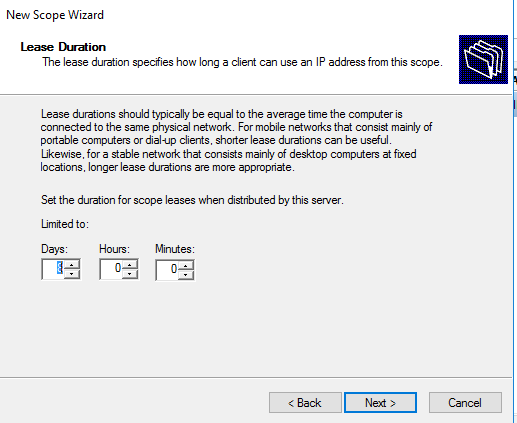
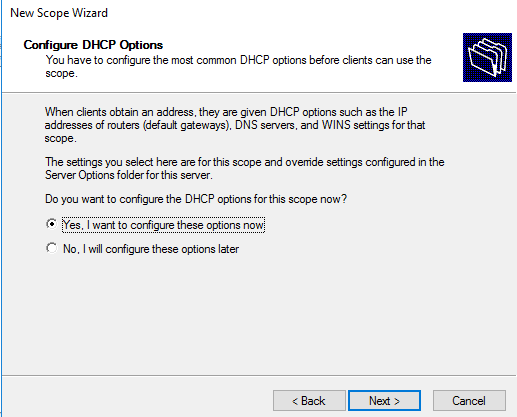
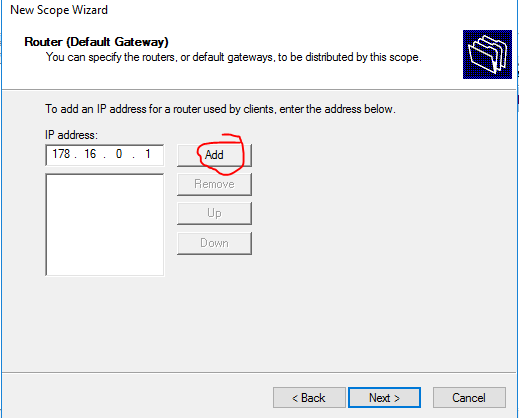
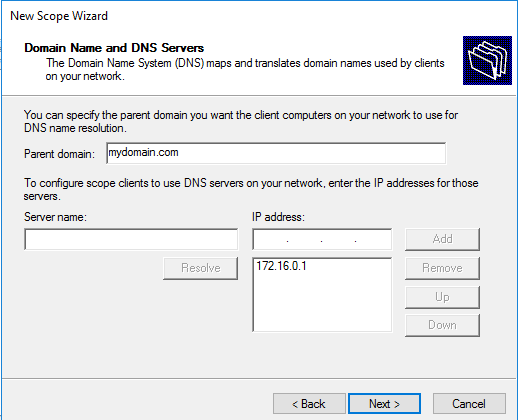
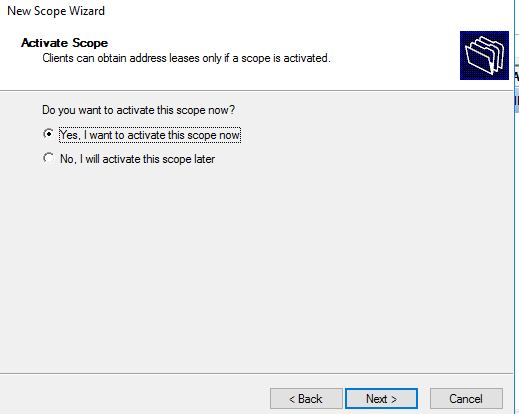
Once the “New Scope Wizard” is open, the first step is to name the new scope. I just named the scope the address range. So in this case (referring to the network diagram above), the name will be “172.16.0.100-200”. Next, configure the address range. The start address will be 172.16.0.100 and the end IP address will be 172.16.0.200. To configure the subnet mask, set the length to 24. This should automatically change our subnet bask to 255.255.255.0. For this scope, I did just follow Josh Madakor’s video directly just for the sake of learning it. If I were to go back and do it again myself, I would probably set the scope options a little different. I would maybe configure it with a conventional Class C IP address (255.255.255.0) And make it something along the lines of 192.168.1.100-192.192.168.1.200 to follow what I’ve learned when studying for the CompTIA A+. I would have thought that the subnet mask for this should have been configured as 255.255.0.0 (length:16). But nonetheless, I just followed the video verbatim on the first time around. For the lease duration you can set it really however you would like. I just left the default at 8 days. The next page asking if you want to configure the rest of the DHCP options now (other than just the scope). Select yes and click next. The first option is configuring the router/default gateway. In this lab, the server (internal NIC) is going to function as the defualt gateway for the client computers. This will mean that the servers internal NIC is what will act as the router for the rest of the clients, which will allow the other clients to access the internet. There was a mistake on the network diagram above and in the picture below (I had made a typo when I was setting up this lab). This was a cool troubleshooting oppourtunity for myself. When I got my client computer up and running, I wasn’t able to access the internet. It was easy to overlook at first when I had ran ipconfig. It was a good learning moment to remind myself to pay attention to the small details. Anyways, in the network diagram, the DHCP configuration says 172.168.0.1 and in the picture below it says 178.16.0.1. What you actually want is the IP address of the internal NIC, which is 172.16.0.1. When you get that typed in, don’t forget to click add before moving on to the next step. For the DNS server, enter your domain name in the “Parent domain” box. The IP address should already be added in the IP address box. For the WINS server, leave it blank and move on. In the last dialogue, select “Yes, I want to activate this scope now”. The configuration is done at this point, but there are just a few more steps to get it up and running and verify that it is activated.
Verifying DHCP is activated
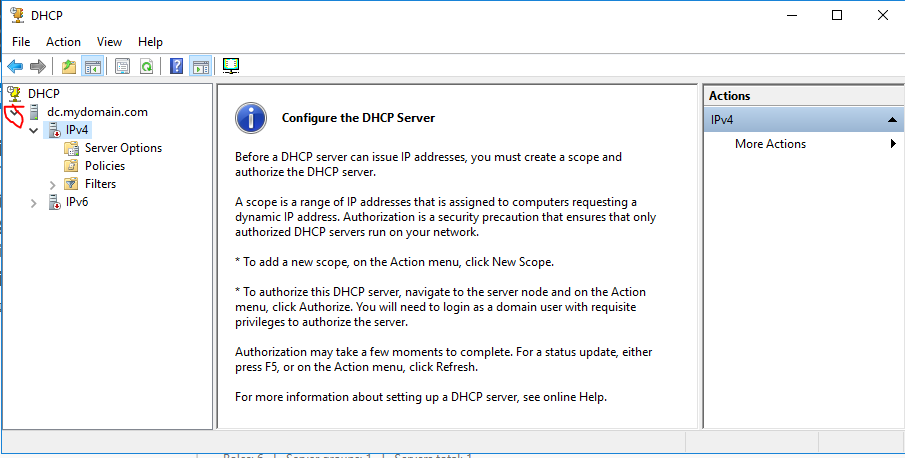
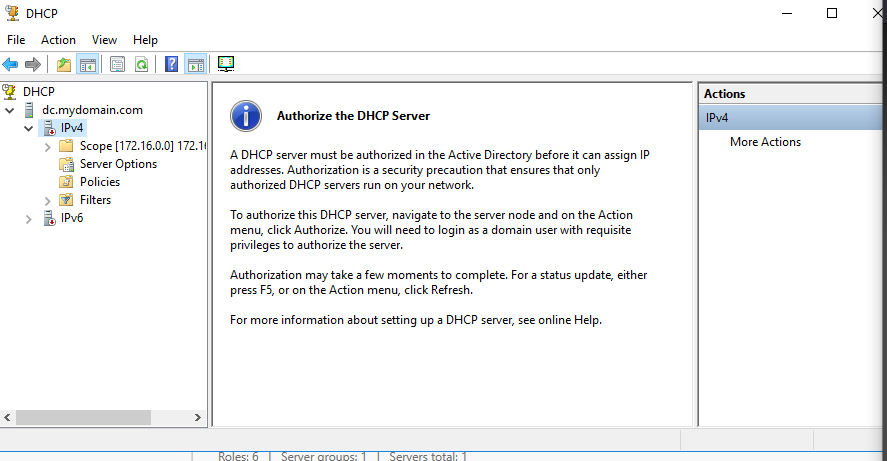
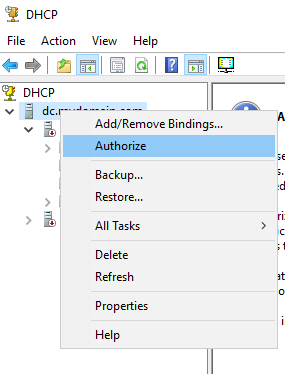
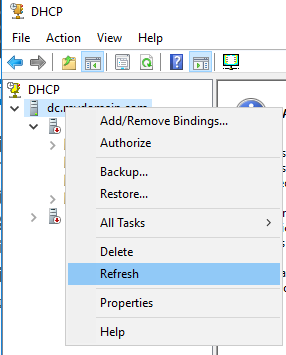
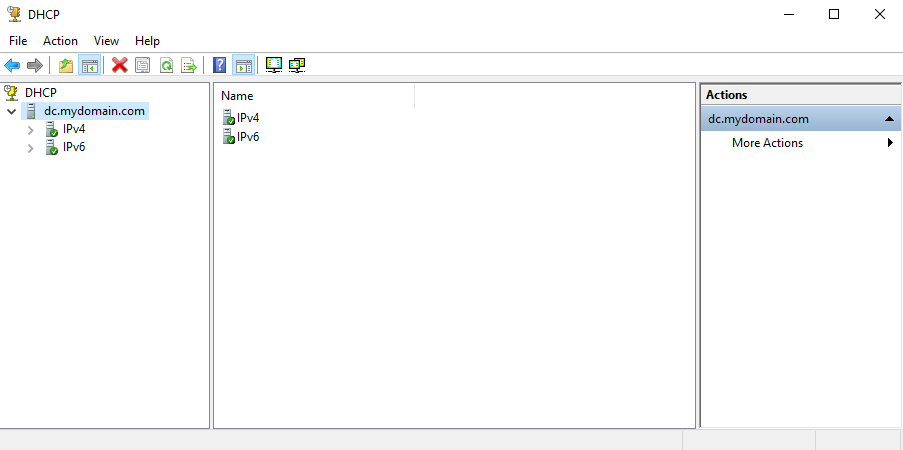
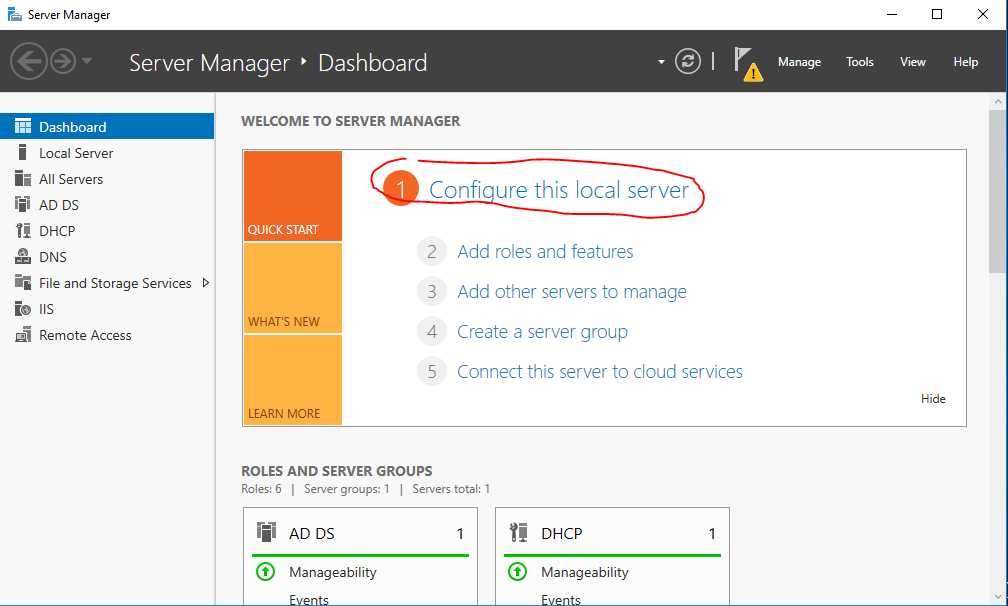
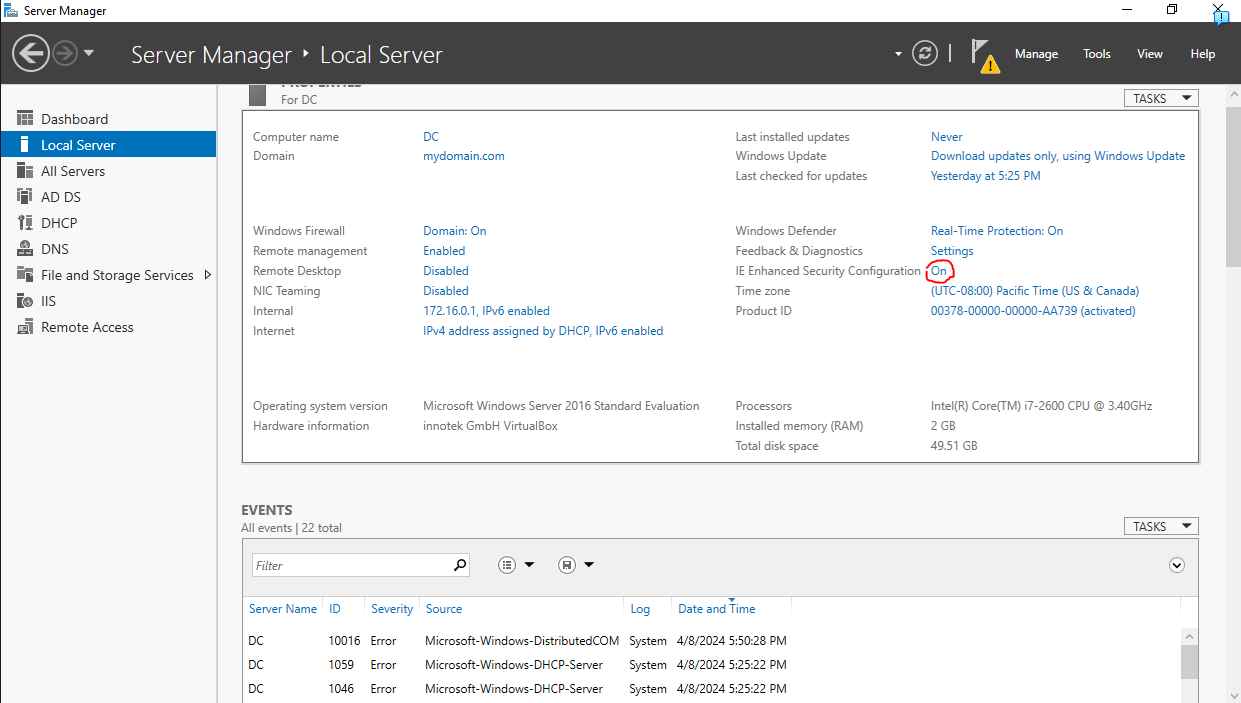
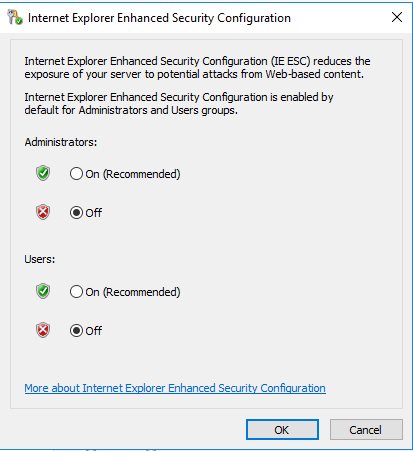
When you finish up activated the scope and are returned to the DHCP tool, the DHCP server will still be down. You can tell this because of the red arrow next to IPv4 and IPv6. To authorize the DHCP server, right click on the domain and select authorize. It may take a second, but you can right-click the domain again and select refresh until it comes up. You will know that the server is active when the red arrow changes to a check mark with a green circle. The last thing in this lab that was suggested for this lab in order to make the experience a little smoother, was to turn off IE Enhanced Security Configuration. It will make browsing the internet a little easier by not continually giving you warnings or blocking access to the web. You probably won’t be doing this in a work setting, but for the sake of the lab and learning its okay. To do this, go back to Server Manager and click on “Configure Local Server”. Once pen, find IE Enhanced Security Configuration and click “On” to bring up the configuration, and select off for both administrators and users. In the next part of his lab, there is a Powershell script that you download so turning this off will make it easy to access.
Final Thoughts
After this post, the server side of this lab is set up and good to go. The next step is to set up a client computer to use to complete the lab and start learning more about Active Directory and how to use it to interact with a domain. To sum up the past few posts;
- Windows Server 2016 VM installation using VirtualBox
- Configuring server NIC cards for internet access and internal network access
- Renaming Windows Server
- Installing Active directory
- Creating a domain and configuring a domain controller
- Creating administrators and users
- Configuring remote access using NAT
- Installing and configuring DHCP
In the next post, I will install Windows 10 on a new virtual machine which will act as a client computer for this lab. Once installed, I will join it to the domain and verify its network connectivity, and set up a local admin account in case the computer gets disconnected from the domain.

Leave a Reply