Skills: Rename PC, Windows, Active Directory, Windows Domain, Domain Configuration, IP configuration
In this post, the main goal is to install Active Directory and set up our Windows Server 2016 machine as a domain controller in Active Directory.
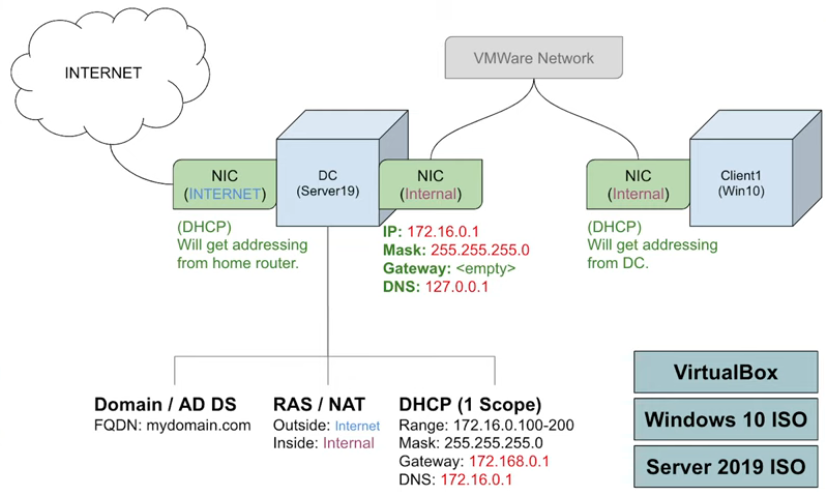
For my first blog post, I was following Kevtech’s Youtube playlist for setting up an Active Directory Lab. I’ve gone through most of that playlist but for the initial setup I actually have switched over to a playlist by Josh Madakor for configuring the initial setup. He does use Server 2019 instead of Server 2016 but I already had a Server 2016 setup so I just used that. There were a couple things I really liked that he did different, such as setting up some configurations in VirtualBox that made the process a little smoother and setting up the network adapters a little different. He has a network diagram for the basis of this setup that includes an adapter that is used for the server to connect to the internet and a separate adapter for the internal network that sections of the internal network and allows the clients to access the internet through the server. Here is the link for the video if you would like to follow along with that. And here is the network diagram used to set up this lab. In this post I will go up until we have the server set up as a domain controller and have an admin account. This part will be a little long, so I will make a separate post finishing the lab set up that includes adding a client computer, configuring RAS/NAT, setting up a DHCP server and configuring the client computer to connect to the network.
VirtualBox settings and Guest Additions
Before I dive into installing Active Directory and the initial configuration settings, here is the VirtualBox configurations that I added to this machine from Josh’s video.
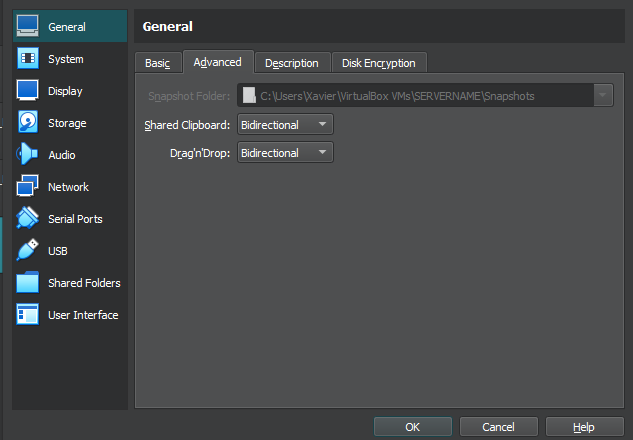
First thing is to set up a “Shared Clipboard” and “Drag’n’Drop”, this allows for copy/paste and drag n drop between the host computer and the virtual machine. In the VirtualBox interface, select your machine and go to Settings.

In General-Advanced, select Bidirectional for “Shared Clipboard” and “Drag’n’Drop”
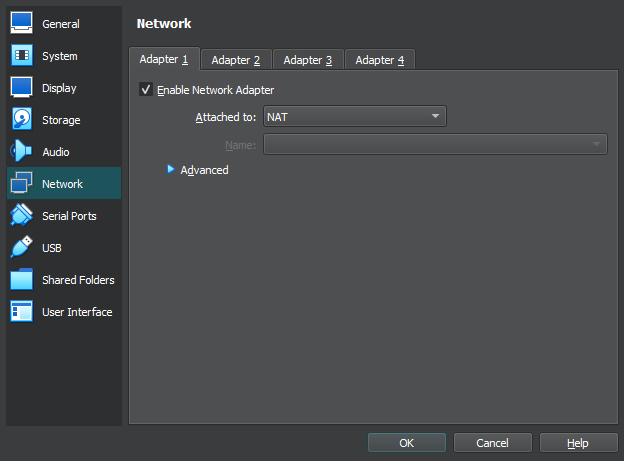
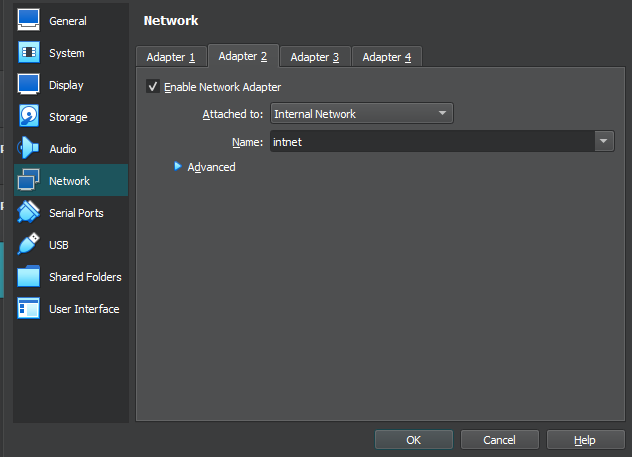
In addition, I also configured the network adapters in VirtualBox so that the VM has an adapter configured NAT, which allows the server to connect to the internet by using the NIC of the host computer to connect to your home internet, and a second adapter configured as Internal Network to connect the server to any client PCs. In the settings in VirtualBox, go to Network. Adapter 1 will most likely be already set to NAT, so leave that as is. Next, select Adapter 2 and in the drop down menu for “Attached to” select Internal Network.
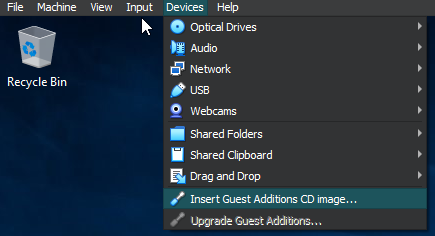
Now that that is all set, we can go ahead and boot up our VM. Lastly, before doing all of our main configurations, we are going to install “VM Guest Additions” in our VM which is an add-on through VirtualBox that improves performance and makes the VM experience a little smoother. Once your machine is started up and you are logged in, on the top menus of VirtualBox, select Devices-Insert Guest Additions CD image.
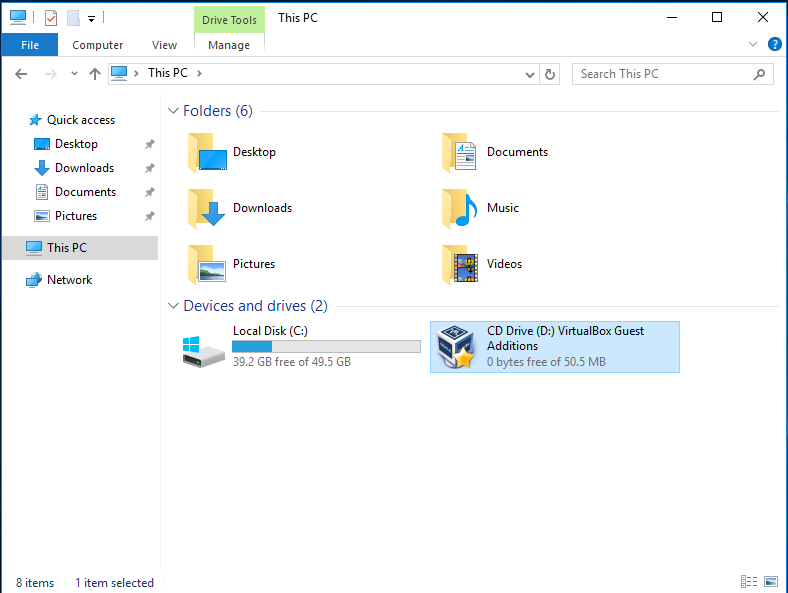
Now, open file explorer (folder icon on taskbar , select “This PC”, and double click on the Guest Additions CD to open it.

With the disk folder opened, double click “VBoxWindowsAdditions-amd64” to begin the installation. Follow through with the installation by selecting next until you can install. When the installation is finished, select “I want to manually reboot later”. You can select Reboot now, but Josh suggested rebooting manually because he had an instance where the tool wasn’t working after reboot. Go ahead and reboot the machine and we will follow through with the next steps.
Network Adapter and Server IP address configuration
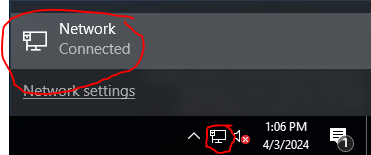
The first thing we are going to do is configure the network adapters and assign an IP address for our server. At the bottom right of your desktop select the internet/network icon in the notification area and click on the network icon that pops up..
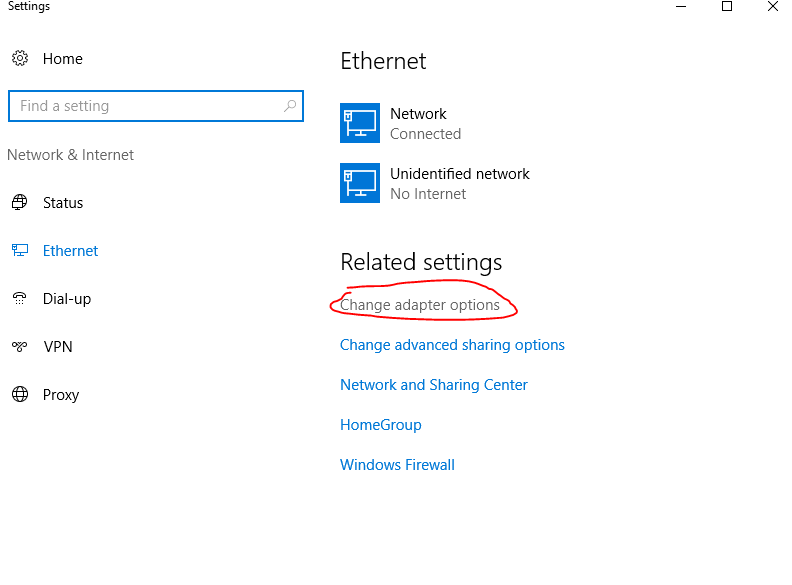
This will open up the Windows Settings where you can select “Change Adapter Options”
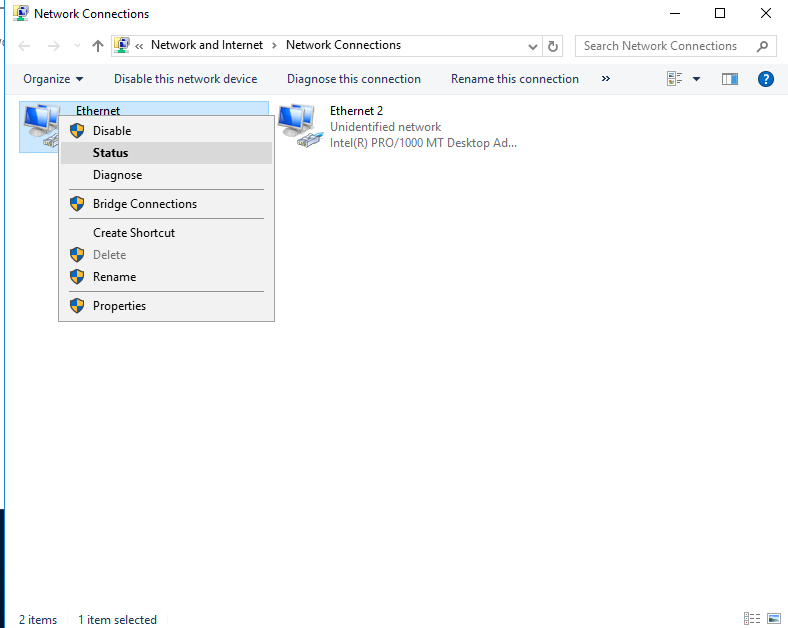
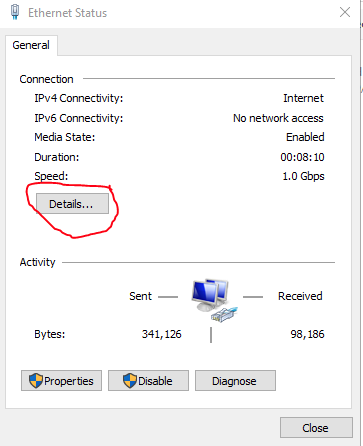
This will open up a window for Network Connections and we can see the two network adapters that we set up in VirtualBox. At the moment, they will be name “Ethernet 1” and “Ethernet 2”. We need to figure out which one is the NAT adapter that is connected to the host computer and which is the adapter for the internal network. Right-click on either adapter and select status. In the Ethernet Status window select “details”.
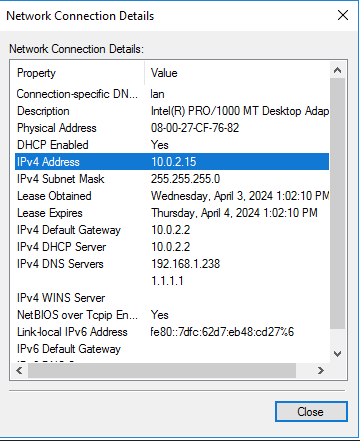
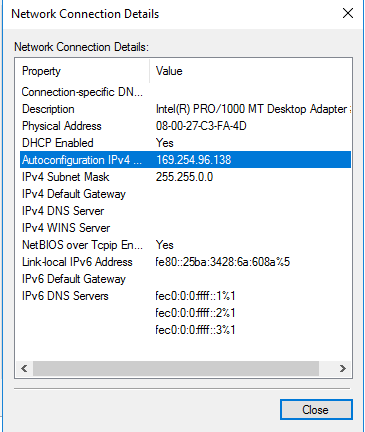
If we compare the details of each adapter, we can figure out which one is connected to the internet and which is the internal adapter. Adapter 1 already has an IP address, gateway, DHCP server, and DNS server so we can make the assumption that this is connected to our router and was assigned this IP address. On the other hand, Adapter 2 has an IP address of 169.254.96.138. This is an APIPA address which shows us Adapter 2 is not connected to the internet and does not have a DHCP server to get an IP address from.
Now that we know which adapter is which, we can rename each adapter to make it easier to identify them. If you go back to the network connections window and right click on each adapter, they can be renamed. I kept it simple and renamed them “Internet” and “Internal”
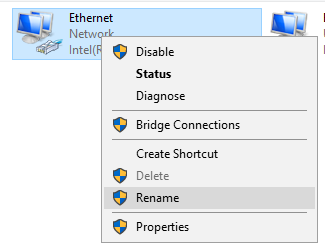

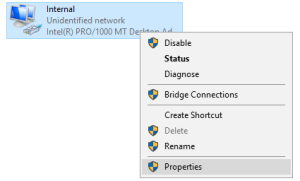
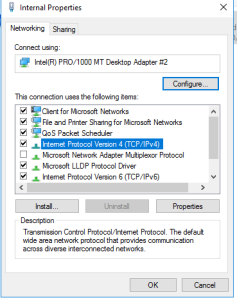
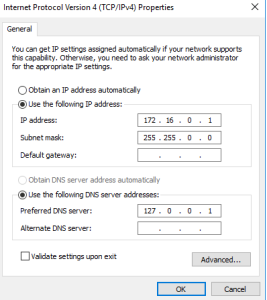
The Internet NIC IP configuration is all good to go so we don’t have to do anything for that because its getting all that from our home router. However, we will assign an IP address for the Internal adapter. To access the IP settings for the adapter, right-click and select “Properties”. In the properties window, find “Internet Protocol Version 4 (TCP/IPv4)” and double-click. Once in here select the bullet “Use the following IP address”. Now, using the network diagram from above, input the IP information. We are leaving the default gateway blank, because this NIC is going to be serving as the default gateway for our clients. And for the DNS we are going to use either the IP address of this NIC or the loopback address. With DNS installed on Active Directory, the server is going to use itself as the DNS server. Once that is all entered, click OK and we are set to continue.

Installing Active Directory Domain Services and Creating a Domain
To install Active Directory, we need to go to/open server manager. It should already be opened when we started up the computer. Once in Server Manager, click “Add Roles and Features”
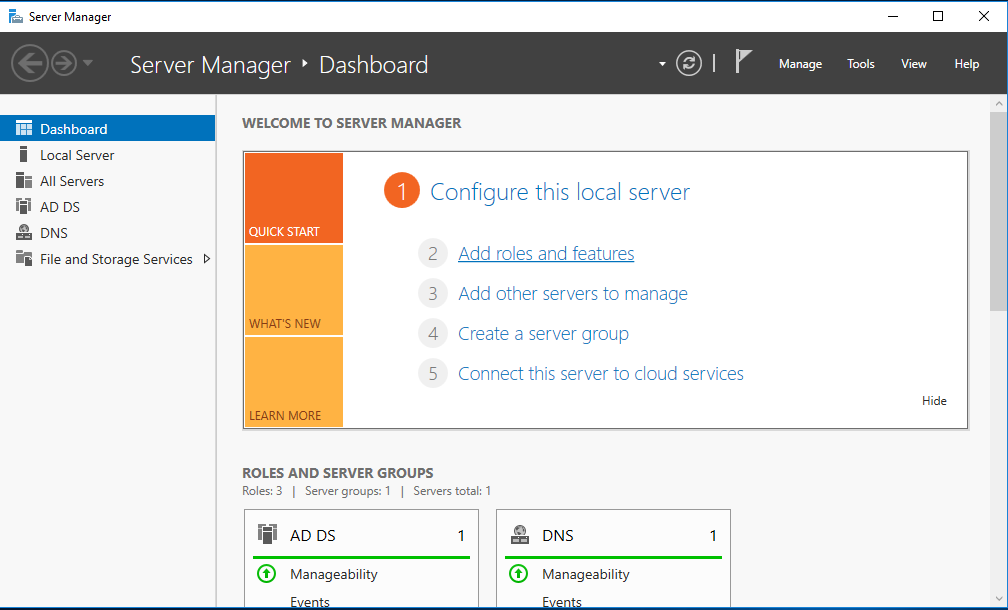
From there we are going to follow through with the installation.
1. Before you begin: Click next
2. Installation Type: Select “Role-based or feature-based installation”
3. Server Selection: Select your server “DC.mydomain.com”
4. Server Roles: Check “Active Directory Domain Services”
4a. Click Add Features on “Add Roles and Features Wizard”
5. Click next on the following steps until you can install.
6. Wait until installation is finished and close
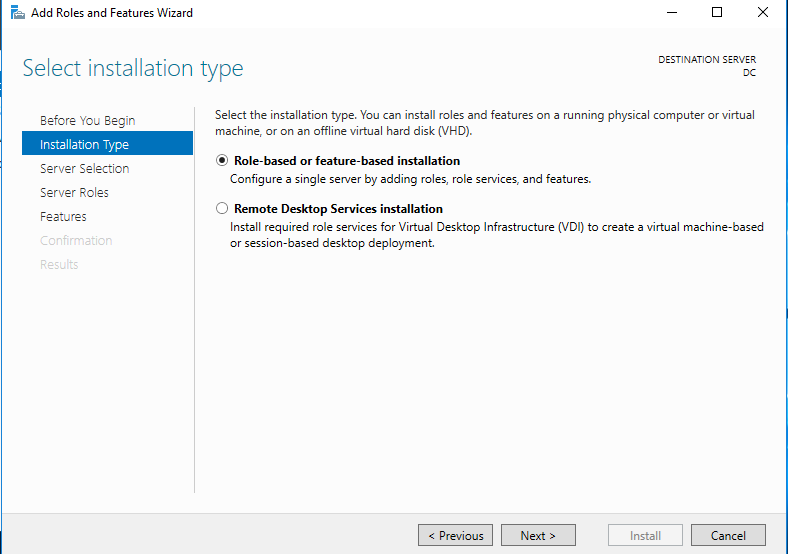
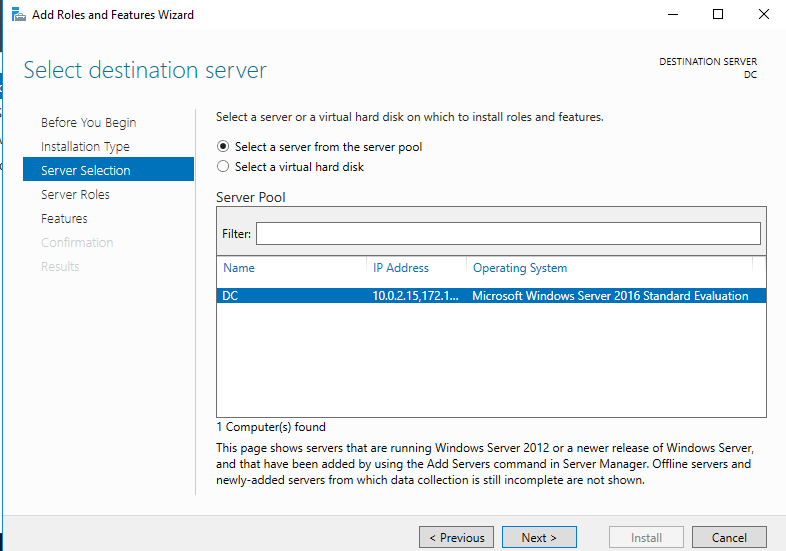
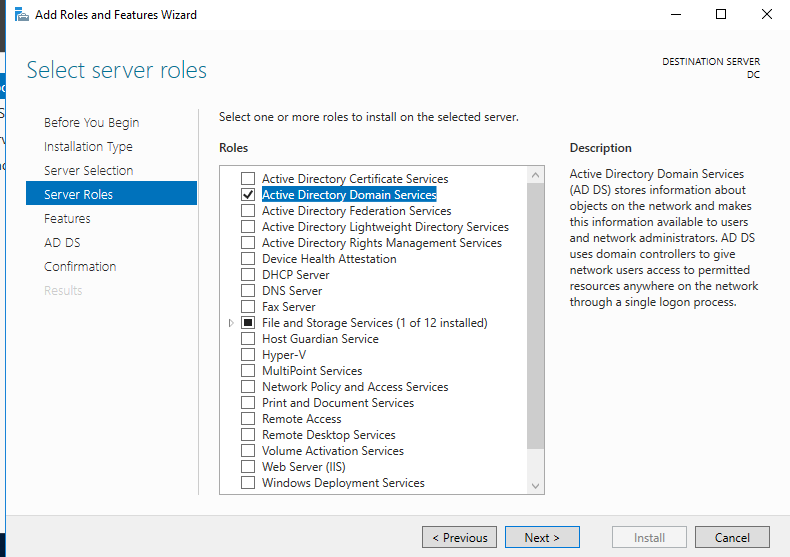
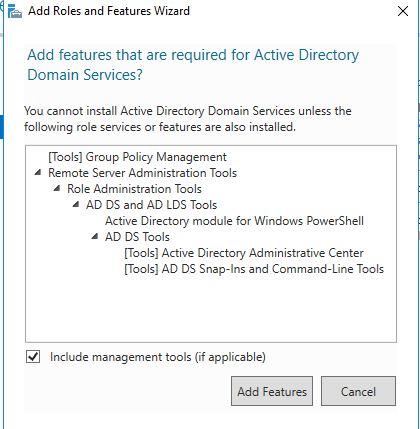
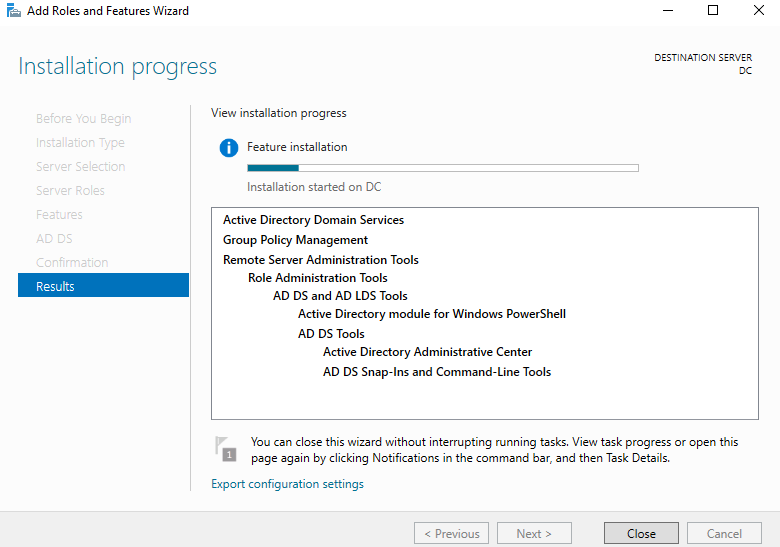
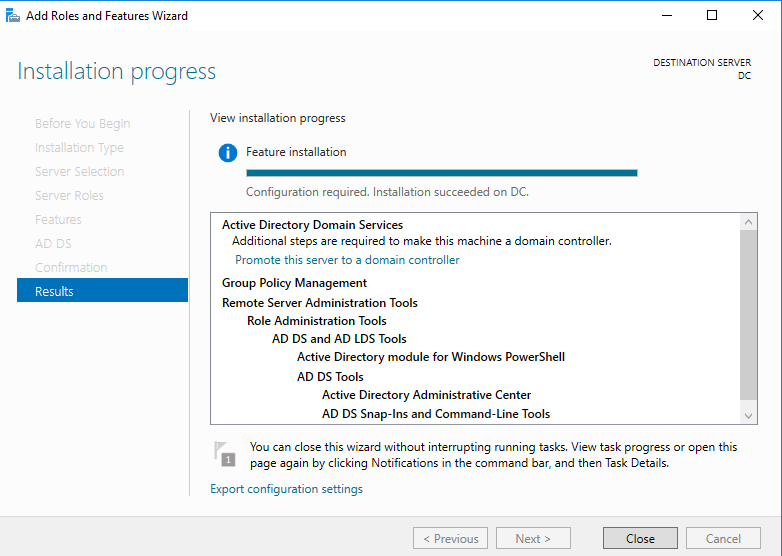
Once the installation is finished, we can promote the server to a domain controller. Go back to Server Manager and in the top right there will be a notification (flag with an exclamation mark). Click on that and in the drop down, click “Promote this server to a domain controller.
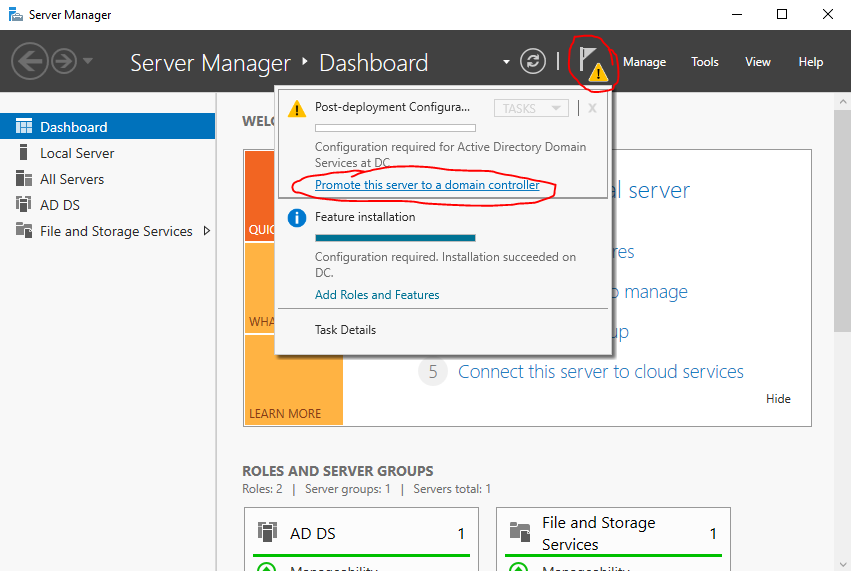
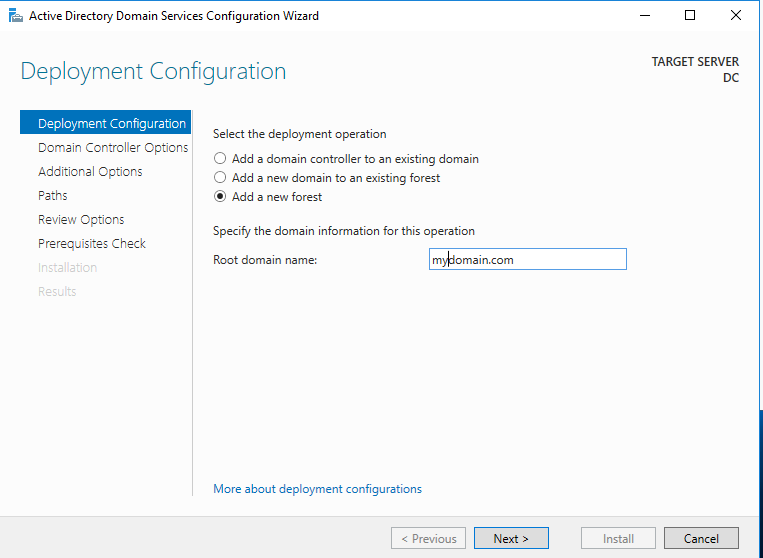
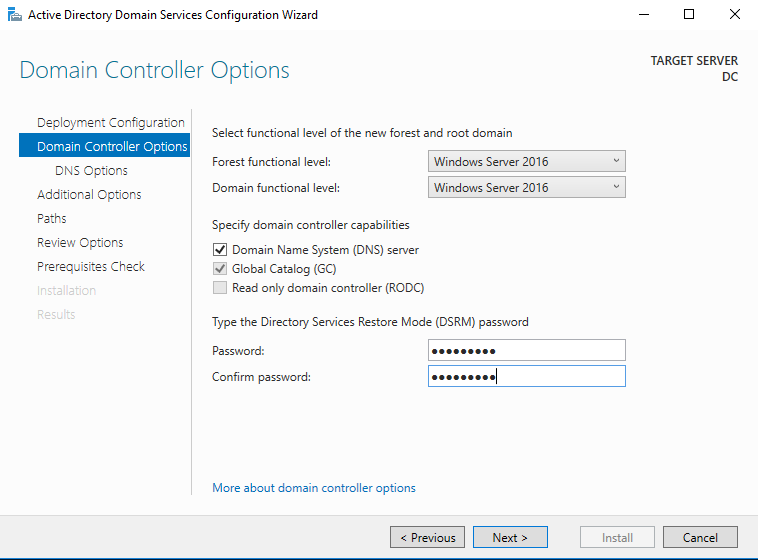
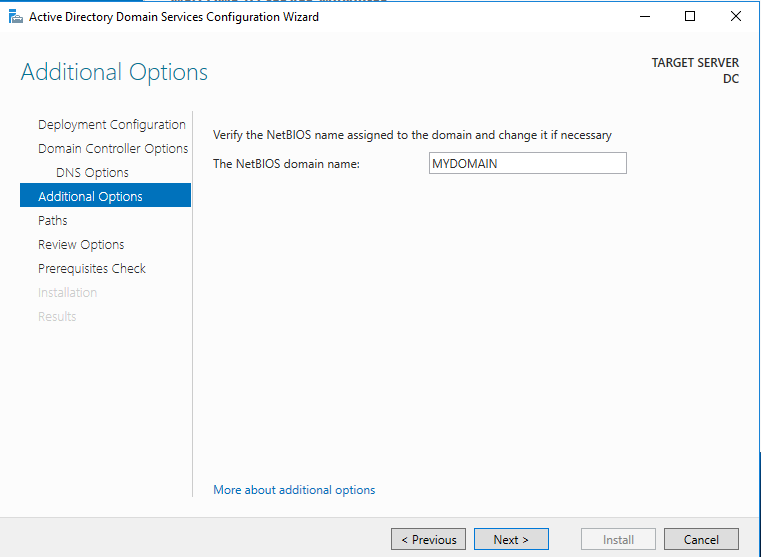
This will open up the “Active Directory Domain Services Configuration Window”. For most of these we will just click next and follow through the installation but there are a couple things to select and fill out. In “Deployment Configuration” select “Add a new forest” and for the root domain name you can enter any name you like but for simplicity I entered “mydomain.com”. On the next option, you will have to enter a restore mode password. For our purposes we won’t really need to use it but it is required to move on. You can enter any password you like but for simplicity here and so it is easy to remember, I se the password as “Password1”. I’m using this as a universal password for this whole lab so I don’t have to remember a bunch of passwords. Obviously this is poor practice in a real setting but for learning it a lab it no problem. When you get to “Additional Options”, you’ll have to just wait for a moment for the “NetBIOS domain name” to fill in automatically. Other then that, just follow through until you can install. You’ll get some errors in the prerequisites check, just ignore those for now for the sake of the lab. It won’t cause us any trouble for our homelab. Once the installation is finished, the server will automatically restart and we can continue to log in to our new domain.
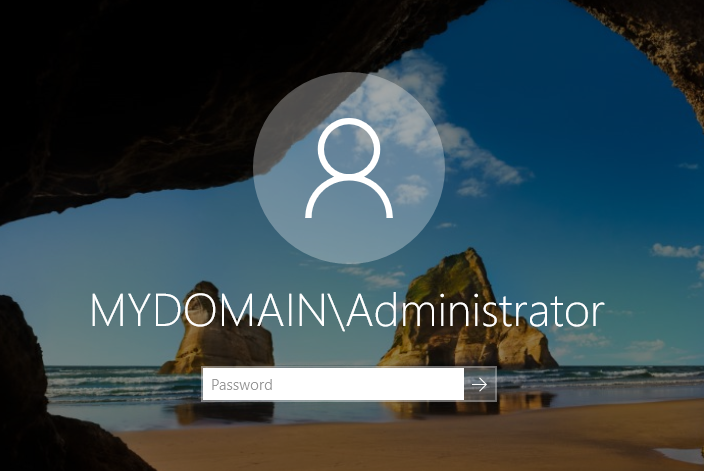
Once the server boots back up, our log in screen will look a little bit different. Instead of just saying a username (which was Administrator), it will now say “MYDOMAIN\Administrator” This is also how we can verify that our domain controller was set up correctly. Now instead of logging in as a user for the computer itself, we are logging in as a part of our new domain (MYDOMAIN). Your password will still be the same as we set before, so go ahead and login with that password.
Creating an Organization Unit and Admin User
Before we can finish our networking configuration for this lab, we need to create an admin account for our domain. In order to do any other configuration, we have to create this account to have permissions to make any new changes. So to do this, we need to access “Active Directory Users & Computers”. There are a couple ways to do this. We can access it from Server Manager-Tools or in this case, you can go to the Start Menu-Windows Administrative Tools-Active Directory Users and Computers.
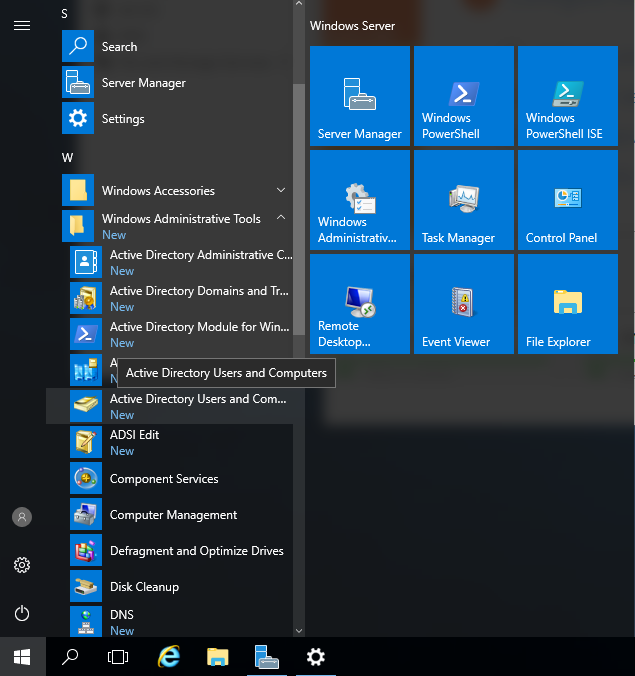
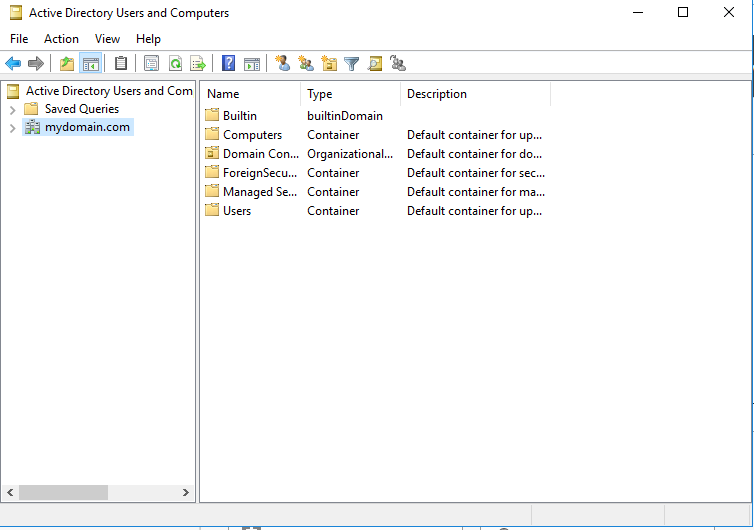
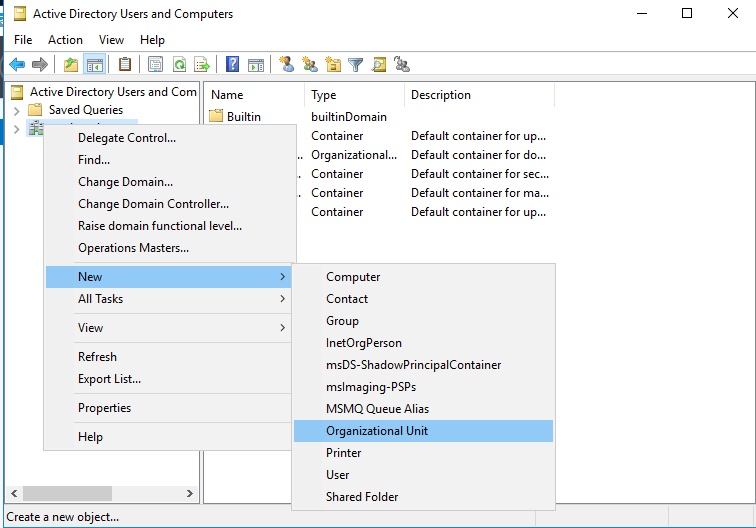
First, we are going to create an Organization Unit (OU) for Admins of our domain. Organization Units, are essentially folders within Active Directory. We can use it to organize user accounts and create units to assign group policy or security features. You can see in Active Directory Users and Computers that our domain is located in the drop down menus on the left-hand side labeled as “mydomain.com” To add a new OU, right click on your domain, and in the drop down menu go to new-organizational unit.
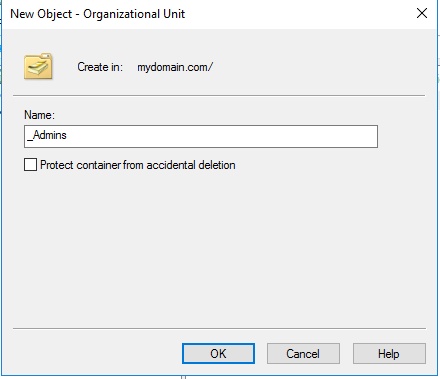
In the new object window, we are going to enter the name “_Admins” and uncheck “Protect from accidental deletion”. It may not be best practice in a work environment, but for the sake of the lab, if we want to mess around and brake stuff later, it will save us some hassle by unchecking that box. Once you do that, you can go ahead and click OK.
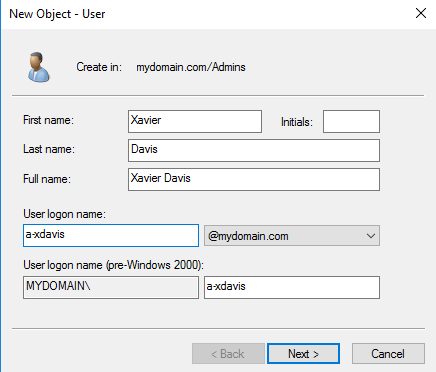
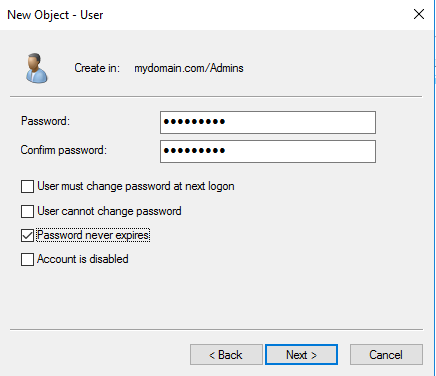
To create a new user in the admin OU, right click on the admin OU, select new-user. A new object window will pop up and we can enter the user info. I used my own name for this. Enter first and last name (full name will fill automatically). And for the username, I put “a-” in front of it to indicate it as an admin account and to mimic what you may see in a corporate environment. So for the username I used the “a-” and first initial-last name, to give us the full username “a-xdavis”. Click next, and enter a password (I’m still continuing to use “Password1″ for all the passwords in this lab”. And for ease in our lab, unselect “User must change password at next logon” and select “Password never expires”. Once the password is set, select next. The next windows will just verify everything you input, select finish.
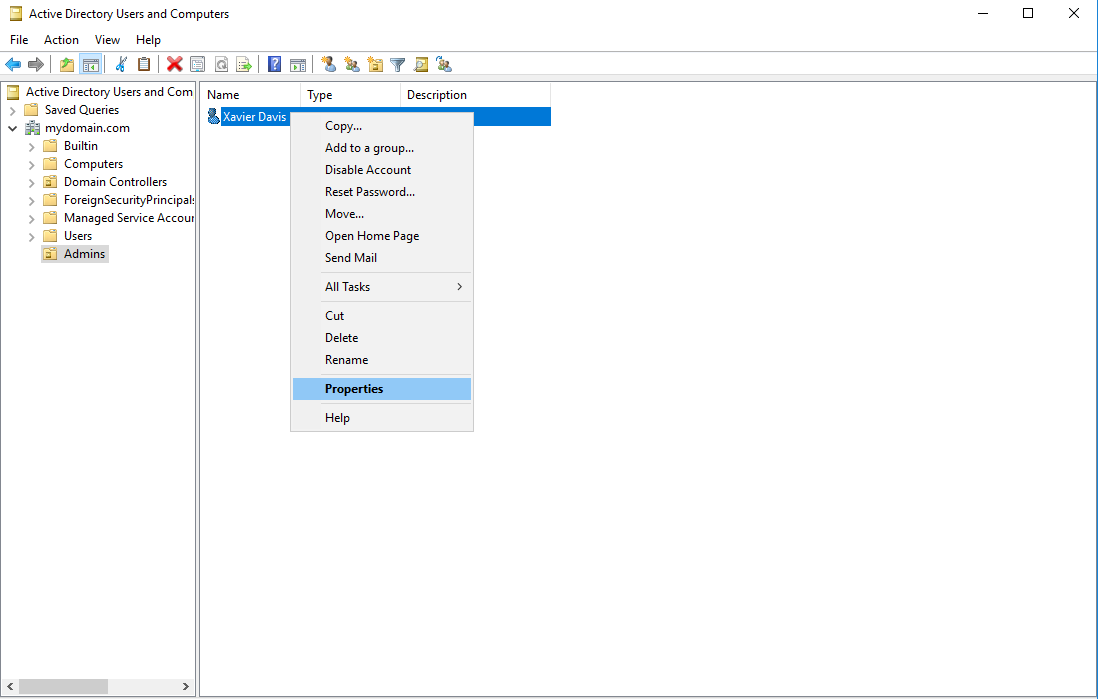
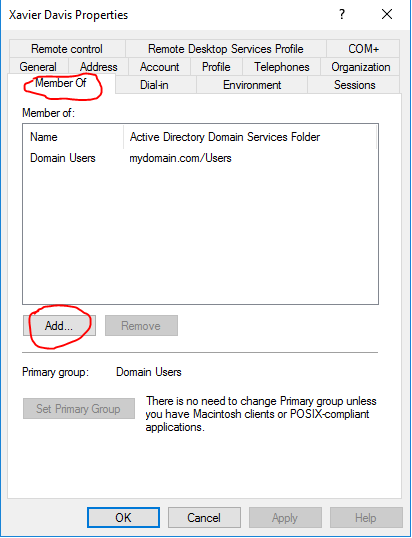
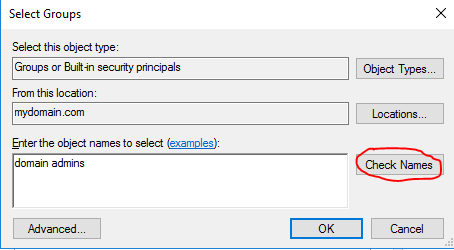
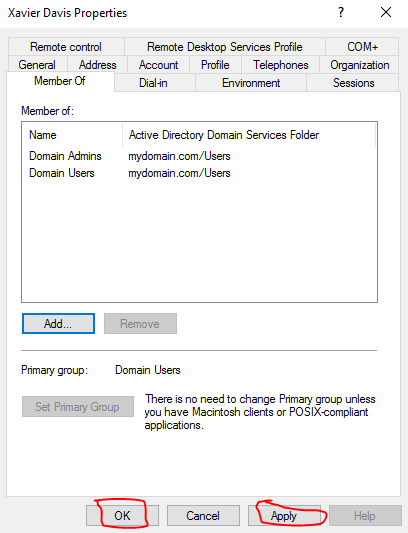
We should see our new user in the admin OU now. Before we finish up, we need to give the user administrative privileges by adding it to the “Domain Admins” security group. Right-click on the user and select properties. Once the properties window is up, go to the sub tab “Member Of” and click “Add…”. In the next window, type “domain admins’ in the box titled “Enter the object names to select”. Next, click “Check Names” and the text should correct itself as the domain admins group. This was kind of odd to me at first, but just trust the process as there is a pre-configured group in Active Directory that grants admin privileges. Click OK. This will bring you back to the last window and you can see that the “Domain Admins” was added to the “Member of” window. Finish up by clicking apply and OK. We’ll dive in a little more into Active Directory Users and Computers in a future post.
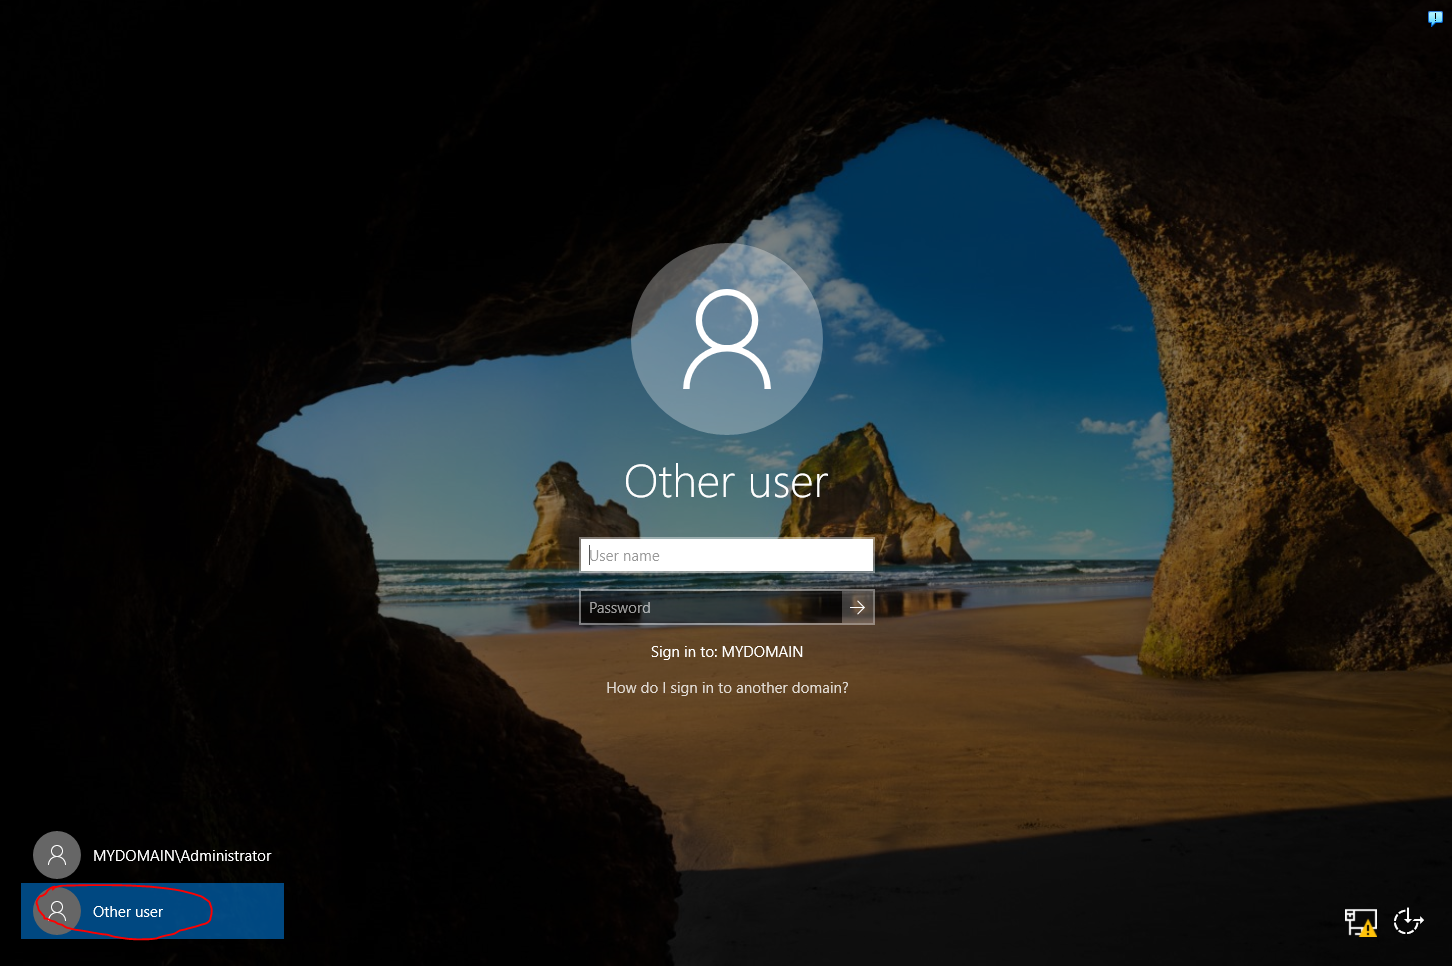
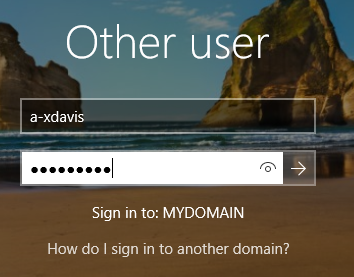
Now that our admin account is created, we need to log in as this user to finish up our final configurations to have this lab up and running. Log out of the current account. When we get to the new login screen (you’ll probably have to Ctrl-Alt-Del again”), select “other user” at the bottom left of the screen. You can tell we are signing in to the domain still, because under the login information you will see that it says “Sign in to: MYDOMAIN”. Enter you admin username (in my case “a-xdavis”) and password to login. We have an admin account now that we can use to control our domain! The first login will take a little bit of time to load, so just be patient.
That will finish us up for this post. Now that we have the admin account on Active Directory, we can finish up some last configurations on the server to finish up the network setup and eventually add a client computer. In the next post, I will set up RAS/NAT, configure a DHCP server, and add a client computer to the network. When adding the client computer, I will also go over installing Windows 10 and joining it to the domain. Thanks to Josh Madakor for the video about setting up this lab! I really liked the way he set up the internal network in a way that emulates a corporate environment and making it seem like a real virtual network in the way that the network interacts.
Leave a Reply